

01
Nov
Simple 433 MHz Remote Links
Draft. This tutorial has not been checked against the physical product yet. Confirm wiring, pin assignments and voltage limits against the product documentation before building it.
| Difficulty | Intermediate |
|---|---|
| Category | Communication |
| Supported boards | Arduino Uno R3 and compatible ATmega328P boards |
| Time needed | 55 minutes |
| Prerequisites | Digital and Analog, and When Each Applies |
| Tested board | Not yet verified |
| Tested on | Not yet verified |
| Arduino IDE version | Not yet verified |
| Library | Not yet verified |
What it does
The cheapest radio link there is. A transmitter the size of a postage stamp, a receiver slightly bigger, and a few lines of code gets a message from one Arduino to another across a building.
It is one-way, slow, and has no error checking worth the name. In exchange it costs almost nothing, needs three wires, and works at a range the NRF24L01 struggles to match outdoors.
For a doorbell, a tank-level reading from the garden, or a switch at the other end of a workshop, it is the right part. For anything carrying real data both ways, it is not.
Before you begin
Required parts and tools
- Two Arduinos. One sends, one receives.
- One transmitter and receiver pair. This is Siratek product 2661.
- Two pieces of wire for antennas, about 17.3 cm each. See below; this matters more than anything else here.
- Six jumper wires.
433 or 315 MHz
The Siratek listing covers both frequencies, and the pair must match. A 433 MHz transmitter and a 315 MHz receiver will never hear each other, and nothing in the behaviour tells you which you have.
The frequency is usually printed on the board, or implied by the colour of the resonator. If you cannot tell, the only reliable way is to test a pair that came together.
In most of the world 433 MHz is the licence-free band, so prefer it unless you have a reason.
The antenna, which is the whole story
These modules are sold without antennas, and without one the range is a few metres at best.
A quarter-wave wire is all it takes:
- 433 MHz: 17.3 cm
- 315 MHz: 23.8 cm
Solder a piece of solid wire that length into the ANT hole on each board. Straight, vertical, and away from the board if you can manage it.
That single change typically takes range from under five metres to fifty or more. If your link is unreliable, fit antennas before suspecting anything else, and before touching the code.
A coiled wire works less well than a straight one. Both ends vertical and parallel works better than one horizontal.
The transmitter likes more volts
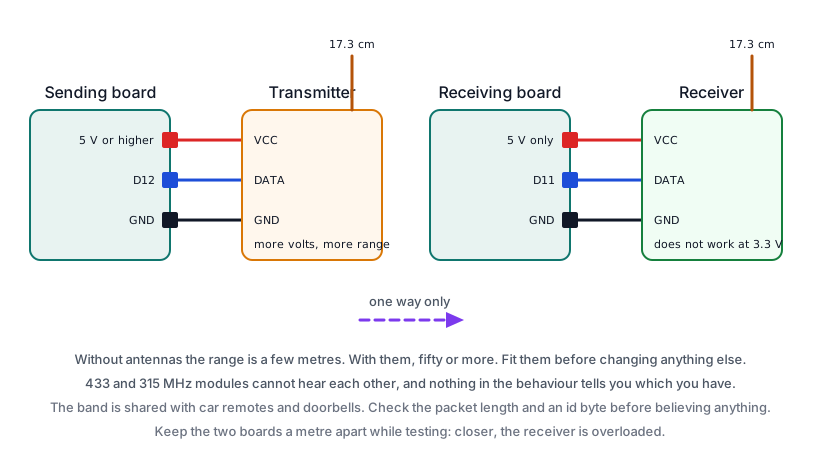
The transmitter accepts 3 to 12 V, and its output power rises with the supply.
- At 5 V from an Arduino: fine indoors, perhaps thirty metres with antennas.
- At 9 or 12 V from a separate supply: considerably further.
The data line is still 5 V logic from the Arduino regardless, so a higher supply voltage on VCC costs nothing in complexity. The grounds must be joined, as always.
The receiver is 5 V only. These superregenerative receivers do not work properly at 3.3 V, so an ESP32 needs either a 5 V supply for the receiver and a divider on the data line, or a different radio altogether.
What it cannot do
- One way. The transmitter cannot receive and the receiver cannot send. Two-way needs two pairs on different frequencies, which is usually the point at which an NRF24L01 becomes the better choice.
- Shared band. Car remotes, doorbells, weather stations and garage doors all use 433 MHz. Your receiver hears all of them, which is why the library’s addressing and checksums matter.
- No real security. Anything transmitted can be received by anyone with a module. Do not use it to unlock anything.
- Slow. Two thousand bits a second is typical, so a short message takes tens of milliseconds.
Pin reference
Transmitter, three pins:
| Pin | Connect to | Notes |
|---|---|---|
VCC |
5 V, or a higher separate supply | More volts, more range |
DATA |
Uno D12 |
5 V logic either way |
GND |
Uno GND |
Join the grounds if using a separate supply |
ANT |
17.3 cm of wire | Not optional |
Receiver, four pins. The two middle pins are both data; use either.
| Pin | Connect to | Notes |
|---|---|---|
VCC |
Uno 5V |
5 V only |
DATA |
Uno D11 |
Either middle pin |
DATA |
Not used | The duplicate |
GND |
Uno GND |
|
ANT |
17.3 cm of wire | Not optional |
Wiring steps
On the sending board:
- Transmitter
VCCto5V,GNDtoGND,DATAtoD12. - Solder 17.3 cm of wire to the antenna pad.
On the receiving board:
- Receiver
VCCto5V,GNDtoGND, one middleDATApin toD11. - Solder 17.3 cm of wire to its antenna pad.
Keep the two boards at least a metre apart for the first test. Closer than that, the receiver can be overloaded, which is the same trap as the NRF24L01.
Software and libraries
Install RadioHead by Mike McCauley through Library Manager. It supersedes the older VirtualWire and handles the framing, addressing and checksums these bare modules do not.
Writing to the modules directly is possible and a poor idea: without framing you get a stream of noise with your data somewhere inside it.
Minimal working example
Transmitter
// Siratek: send a reading every two seconds.

#include <RH_ASK.h>
#include <SPI.h>          // RadioHead needs this even though we are not using SPI

// speed, receive pin, transmit pin
RH_ASK radio(2000, 11, 12);

struct Message {
  uint8_t  id;            // which sender this is
  uint16_t count;
  int16_t  valueTenths;
};

Message message = {1, 0, 0};

void setup() {
  Serial.begin(9600);
  if (!radio.init()) {
    Serial.println("Siratek: radio init failed");
  }
}

void loop() {
  message.count++;
  message.valueTenths = 243;             // 24.3, as tenths

  radio.send((uint8_t*) &message, sizeof(message));
  radio.waitPacketSent();

  Serial.print("sent ");
  Serial.println(message.count);

  delay(2000);
}
Receiver
// Siratek: receive, and ignore everything that is not ours.

#include <RH_ASK.h>
#include <SPI.h>

RH_ASK radio(2000, 11, 12);

struct Message {
  uint8_t  id;
  uint16_t count;
  int16_t  valueTenths;
};

uint16_t lastCount = 0;

void setup() {
  Serial.begin(9600);
  if (!radio.init()) {
    Serial.println("Siratek: radio init failed");
  }
  Serial.println("listening.");
}

void loop() {
  Message message;
  uint8_t length = sizeof(message);

  if (!radio.recv((uint8_t*) &message, &length)) {
    return;
  }

  // The band is busy. Check the length and the id before believing anything.
  if (length != sizeof(message) || message.id != 1) {
    return;
  }

  if (message.count != lastCount + 1 && lastCount != 0) {
    Serial.print("  missed ");
    Serial.print(message.count - lastCount - 1);
    Serial.println(" packet(s)");
  }
  lastCount = message.count;

  Serial.print("count ");
  Serial.print(message.count);
  Serial.print("  value ");
  Serial.println(message.valueTenths / 10.0, 1);
}
Three things here are the difference between a link that works and one that drives you mad.
The length check. RadioHead’s checksum catches corruption, but a neighbour’s doorbell can still produce a frame that passes. Comparing the length against your own struct discards almost all of it.
The id field. One byte, and it means your receiver ignores every other 433 MHz device in the street. Without it, a car remote going past produces a reading.
The sequence count. It tells you what you are losing. At the edge of range a link does not fail cleanly; it starts dropping packets, and without a counter that is invisible.
Sending something only occasionally
For a doorbell or an alarm, sending once is unreliable: a single packet lost means nothing happened. Send it several times.
for (int i = 0; i < 5; i++) {
  radio.send((uint8_t*) &message, sizeof(message));
  radio.waitPacketSent();
  delay(50);
}
The receiver then needs to ignore repeats, which the sequence count makes easy: act only when count is new.
Expected result
With antennas fitted, a packet every two seconds across a house, and the count arriving unbroken nearby.
Walk away until packets start being missed. That distance, with the antennas you fitted, is your real range, and it will be several times what you get without them.
Troubleshooting
| Symptom | Likely cause | Check or fix |
|---|---|---|
| Range of a few metres | No antennas | 17.3 cm of wire on each board |
| Nothing received at all | 433 against 315 MHz | The pair must match |
| Nothing received, frequency matches | DATA pins, or the receiver at 3.3 V |
The receiver is 5 V only |
| Works far away, fails adjacent | Receiver overloaded | A metre apart for testing |
| Random nonsense received | Other 433 MHz traffic | Check the length and an id byte |
| Packets missed intermittently | At the edge of range | Expected; a sequence count shows it |
| Transmitter range poor at 5 V | Power rises with supply | Try 9 or 12 V on VCC only |
| Receiver output noisy with no sender | Normal for this receiver type | The library’s framing discards it |
| Works indoors, not between buildings | Walls and distance | Raise the antennas; keep them vertical |
| Two-way needed | These are one-way parts | Use an NRF24L01 |
Next steps
- Easier first: Digital and Analog, and When Each Applies, which is all the theory needed.
- Related: Board-to-Board Radio with NRF24L01, for two-way links with acknowledgements.
- Next project: a tank-level sensor in the garden reporting to a display indoors.
Sources and attribution
All text, wiring guidance and code in this tutorial are original Siratek work.
- RadioHead library documentation for the
RH_ASKinterface. - Quarter-wave antenna lengths are calculated from the wavelength at 433 and 315 MHz.
- The four-pin receiver with its tuning adjustment and the frequency pairing were read from the Siratek product listing and photographs for item 2661.
Range figures depend entirely on antennas, supply voltage and surroundings, and the tutorial gives a procedure for measuring your own. The statement that these links provide no security follows from their having no encryption or authentication. No third-party tutorial text, diagrams, photographs or code has been reproduced here.