

01
Nov
Project, a Mini Weather Station
Draft. This tutorial has not been checked against the physical product yet. Confirm wiring, pin assignments and voltage limits against the product documentation before building it.
| Difficulty | Intermediate |
|---|---|
| Category | Projects |
| Supported boards | Arduino Uno R3 and compatible ATmega328P boards |
| Time needed | 120 minutes |
| Prerequisites | Pressure and Altitude with a BMP280 |
| Tested board | Not yet verified |
| Tested on | Not yet verified |
| Arduino IDE version | Not yet verified |
| Library | Not yet verified |
What you will build
A small screen showing temperature, humidity and air pressure, with a three-hour pressure trend that tells you whether the weather is turning.
Two sensors and a display, which does not sound like much. What makes it a project rather than three tutorials stacked together is that the three devices share one I2C bus and one small Arduino, and making that work teaches the things every multi-sensor build needs: address clashes, memory pressure, and the fact that one of your three parts is 3.3 V and the others are not.
Before you begin
Parts
| Part | Siratek product | Its own tutorial |
|---|---|---|
| Arduino Uno | 2219 | Getting Started with Arduino Uno |
| BMP280 pressure sensor | 2910 | Pressure and Altitude with a BMP280 |
| DHT11 temperature and humidity | 2837 | Read Temperature and Humidity with DHT11 |
| 0.96 inch OLED display | 2459 | A 0.96 inch OLED Display |
| Breadboard and jumper wires | Using a Breadboard |
A logic level converter, Siratek 8440, is strongly recommended. See below.
Three things to settle before wiring
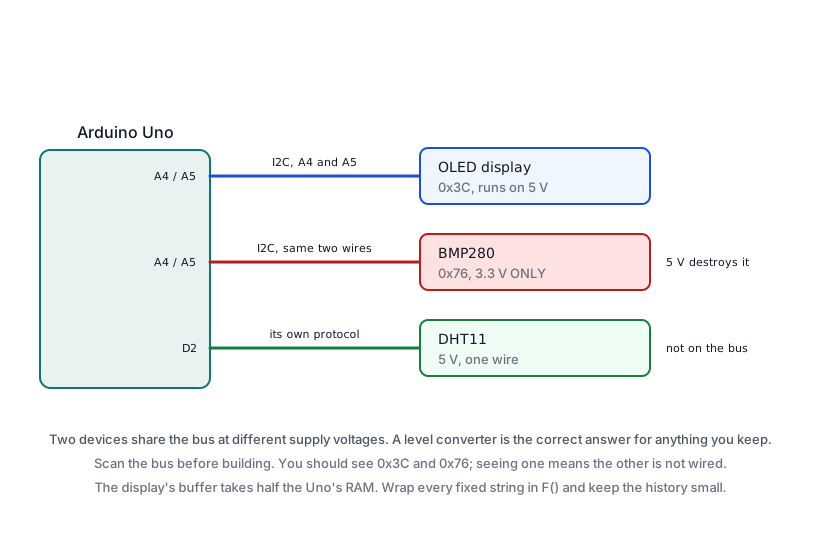
The BMP280 is 3.3 V only. It has no regulator and no level shifter, so its VCC goes to the Uno’s 3.3V pin. The OLED has a regulator and takes 5 V. Two devices on one bus wanting different supplies is the first real integration problem in this library, and Mixing 3.3 V and 5 V Safely is the page that addresses it.
For a bench build, powering the BMP280 from 3.3V and sharing the bus works, and is out of specification for the reasons that page explains. For something you will keep, put a level converter between the Uno and the BMP280.
The addresses do not clash, and you should confirm it anyway. The OLED answers at 0x3C and the BMP280 at 0x76. Run the bus scanner before building anything; thirty seconds now saves an hour later.
The DHT11 is not on the bus at all. It has its own one-wire protocol and takes a digital pin of its own. Only two of the three devices share A4 and A5.
The memory problem, which decides the design
This project is the first in the library that genuinely runs out of RAM on an Uno, and it is worth understanding before you write anything.
| Consumer | Approximate RAM |
|---|---|
| Adafruit SSD1306 screen buffer | 1024 bytes |
| Adafruit BMP280 and Unified Sensor | a couple of hundred |
| DHT library | modest |
| Everything else in your sketch | what is left of 2048 |
So the display alone takes half the board’s memory before your variables exist. Add the three-hour history the trend needs and it gets tight.
Three habits make it fit, and all three appear in the sketch below:
- Wrap every fixed string in
F(), which keeps it in program memory. - Store the pressure history as
int, notfloat. Tenths of a hectopascal in a 16-bit integer is accurate enough and halves the array. - Sample every ten minutes, not every second. Eighteen samples cover three hours; 10,800 would not fit and would tell you nothing more.
If the IDE warns about low memory, take it seriously here. It is the one project in this library where that warning is routinely the actual cause of trouble.
How it works
The sketch has three jobs running at different rates, and none of them may block the others:
| Job | How often | Why |
|---|---|---|
| Read the DHT11 | Every 2 seconds | Its minimum interval |
| Read the BMP280 | Every 2 seconds | Fast; no reason to wait |
| Redraw the screen | Every 2 seconds | Matches the readings |
| Record a pressure sample | Every 10 minutes | Eighteen of them is three hours |
All four run from the millis() pattern. There is no delay() anywhere in loop().
The trend is the difference between the newest sample and the oldest, over three hours. The conventional threshold is 1.5 hPa: more than that falling suggests deteriorating weather, more than that rising suggests it is clearing. Those are meteorological conventions, not something the sensor knows.
Build it in stages
Stage 1: scan the bus
Before anything else, wire power and the two I2C lines to the OLED and the BMP280, and run the scanner from I2C, Two Wires and Many Devices.
You should see 0x3C and 0x76. If you see only one, that device is wired and the other is not. If you see neither, SDA and SCL are swapped.
Do not proceed until both appear. Everything after this depends on it.
Stage 2: the display alone
Get “Siratek” onto the screen with the OLED tutorial’s example. That proves the display, the libraries and the memory situation in one step.
Note the memory figure the IDE reports. You will watch it fall as the project grows.
Stage 3: one sensor at a time
Add the BMP280 and print pressure to the serial monitor. Then add the DHT11 and print temperature and humidity. Serial first, screen second: a reading that is wrong is much easier to see as a number than as part of a layout.
Stage 4: put it together
The complete sketch below.
Pin reference
| Device | Pin | Connect to | Notes |
|---|---|---|---|
| OLED | GND |
Uno GND |
|
| OLED | VDD |
Uno 5V |
It has a regulator |
| OLED | SCK |
Uno A5 |
I2C clock, despite the name |
| OLED | SDA |
Uno A4 |
|
| BMP280 | GND |
Uno GND |
|
| BMP280 | VCC |
Uno 3.3V |
Never 5 V |
| BMP280 | SCL |
Uno A5 |
Shared bus |
| BMP280 | SDA |
Uno A4 |
Shared bus |
| DHT11 | + |
Uno 5V |
|
| DHT11 | OUT |
Uno D2 |
Not on the bus |
| DHT11 | - |
Uno GND |
The complete sketch
// Siratek: a mini weather station.
// BMP280 and OLED share the I2C bus; the DHT11 has its own pin.

#include <Wire.h>
#include <Adafruit_GFX.h>
#include <Adafruit_SSD1306.h>
#include <Adafruit_BMP280.h>
#include <DHT.h>

Adafruit_SSD1306 display(128, 64, &Wire, -1);
Adafruit_BMP280 bmp;
DHT dht(2, DHT11);

// Eighteen samples at ten minutes is three hours.
const int HISTORY = 18;
int pressureTenths[HISTORY];      // hPa x 10, as int to save RAM
int samples = 0;

const unsigned long READ_EVERY   = 2000;
const unsigned long SAMPLE_EVERY = 600000UL;

unsigned long lastRead = 0;
unsigned long lastSample = 0;

float temperature = NAN;
float humidity = NAN;
float pressure = NAN;

void setup() {
  Serial.begin(9600);

  if (!display.begin(SSD1306_SWITCHCAPVCC, 0x3C)) {
    Serial.println(F("no display at 0x3C"));
    for (;;) { delay(100); }
  }
  display.clearDisplay();
  display.setTextColor(SSD1306_WHITE);
  display.setTextSize(1);
  display.setCursor(0, 0);
  display.println(F("Siratek"));
  display.println(F("starting..."));
  display.display();

  if (!bmp.begin(0x76)) {
    Serial.println(F("no BMP280 at 0x76: check VCC is on 3.3V"));
  }

  dht.begin();

  lastRead = millis() - READ_EVERY;
  lastSample = millis() - SAMPLE_EVERY;
}

void takeReadings() {
  float t = dht.readTemperature();
  float h = dht.readHumidity();

  // Keep the last good value rather than displaying nan.
  if (!isnan(t)) temperature = t;
  if (!isnan(h)) humidity = h;

  pressure = bmp.readPressure() / 100.0F;
}

void recordSample() {
  for (int i = HISTORY - 1; i > 0; i--) {
    pressureTenths[i] = pressureTenths[i - 1];
  }
  pressureTenths[0] = (int) (pressure * 10.0F);

  if (samples < HISTORY) {
    samples++;
  }
}

// Returns the three-hour change in hPa, or NAN while still collecting.
float trend() {
  if (samples < HISTORY) {
    return NAN;
  }
  return (pressureTenths[0] - pressureTenths[HISTORY - 1]) / 10.0F;
}

void draw() {
  display.clearDisplay();

  display.setTextSize(1);
  display.setCursor(0, 0);
  display.print(F("Siratek"));

  display.setTextSize(2);
  display.setCursor(0, 14);
  if (isnan(temperature)) {
    display.print(F("--"));
  } else {
    display.print(temperature, 1);
  }
  display.setTextSize(1);
  display.print(F(" C"));

  display.setTextSize(1);
  display.setCursor(0, 36);
  display.print(F("humidity  "));
  if (isnan(humidity)) {
    display.print(F("--"));
  } else {
    display.print(humidity, 0);
  }
  display.print(F(" %"));

  display.setCursor(0, 46);
  display.print(F("pressure  "));
  display.print(pressure, 1);

  display.setCursor(0, 56);
  float change = trend();
  if (isnan(change)) {
    display.print(F("collecting history"));
  } else if (change < -1.5) {
    display.print(F("falling: unsettled"));
  } else if (change > 1.5) {
    display.print(F("rising: clearing"));
  } else {
    display.print(F("steady"));
  }

  display.display();
}

void loop() {
  if (millis() - lastRead >= READ_EVERY) {
    lastRead = millis();
    takeReadings();
    draw();
  }

  if (millis() - lastSample >= SAMPLE_EVERY) {
    lastSample = millis();
    recordSample();

    Serial.print(F("sample "));
    Serial.print(samples);
    Serial.print(F("/"));
    Serial.print(HISTORY);
    Serial.print(F("  "));
    Serial.println(pressure, 1);
  }
}
Three decisions worth explaining
Last good values are kept. A DHT11 read fails occasionally, and a screen showing nan looks broken. Keeping the previous reading and only replacing it on success means a momentary failure is invisible, which is correct for a display that updates every two seconds.
clearDisplay() is used freely. That is the opposite of the advice in the LCD tutorial, and right for the reason given there: on an OLED it clears a RAM buffer, and the screen only changes when display() is called, so there is no flicker.
The trend says “collecting history” for three hours. A project that silently shows “steady” before it has any data is lying. Saying what it is doing costs one branch.
Testing it
| Try this | It should |
|---|---|
| Breathe gently near the DHT11 | Humidity climbs several percent, then falls back |
| Hold the BMP280 and lift it a metre | Pressure falls by about 0.1 hPa |
| Disconnect the DHT11 | Temperature freezes at its last value, everything else carries on |
| Leave it three hours | The trend line changes from “collecting history” |
| Check the IDE’s memory report | Comfortably above 200 bytes free |
The third is the one worth doing deliberately. Pulling a wire and watching the rest of the project continue is how you find out whether you built something robust or something brittle.
Making it yours
- Log it. Add the SD card module and write a line every ten minutes alongside the sample. The data logger project does exactly this, and a month of pressure plotted in a spreadsheet is genuinely interesting.
- A real timestamp. The DS3231 gives each reading a date and time rather than an elapsed count.
- Swap the DHT11 for a DHT22. One word in the constructor, and you get a tenth of a degree instead of whole numbers. DHT22, Better Accuracy Than the DHT11 covers it.
- Move it to an ESP32. Everything becomes 3.3 V so the level question disappears, the memory pressure vanishes, and the MQTT project puts the readings on your phone.
That last one is the honest upgrade path. This project fits on an Uno, and only just.
Troubleshooting
| Symptom | Likely cause | Check or fix |
|---|---|---|
| Scanner finds nothing | SDA and SCL swapped |
SDA is A4, SCL is A5 |
| Scanner finds only 0x3C | BMP280 not powered | Check VCC is on 3.3V |
| BMP280 dead after working | 5 V applied to it | That board is 3.3 V only |
| Display blank | display() not called, or wrong address |
Both are in setup() |
| Garbled display, random resets | Out of RAM | F() on every string; keep history small |
Temperature shows -- |
DHT11 read failing | Check the 2 second interval and the wiring |
| Pressure reads 0 | BMP280 not found | Look at the startup message |
| Trend never appears | Fewer than 18 samples yet | Three hours at ten minutes each |
| Readings freeze | A delay() in loop() |
Everything is on millis() |
| Works alone, fails together | Address clash or supply | Scan with both connected |
| Temperature reads a degree or two high | Self-heating, and the board nearby | Mount the DHT11 away from the Uno |
Sources and attribution
All text, wiring guidance and code in this project are original Siratek work.
- Component behaviour is as described in Pressure and Altitude with a BMP280, Read Temperature and Humidity with DHT11 and A 0.96 inch OLED Display, including the BMP280’s 3.3 V supply limit, the DHT11’s two-second interval and the display’s 1024-byte RAM buffer.
- The three-hour window and the 1.5 hPa threshold are conventional meteorological practice rather than properties of the sensor.
No third-party tutorial text, diagrams, photographs or code has been reproduced here.