

01
Nov
How an Arduino Actually Works
Draft. This tutorial has not been checked against the physical product yet. Confirm wiring, pin assignments and voltage limits against the product documentation before building it.
| Difficulty | Beginner |
|---|---|
| Category | Foundations |
| Supported boards | Arduino Uno R3 and compatible ATmega328P boards |
| Time needed | 20 minutes |
| Prerequisites | Getting Started with Arduino Uno |
| Tested board | Not yet verified |
| Tested on | Not yet verified |
| Arduino IDE version | Not yet verified |
| Library | Not yet verified |
What this covers
You have uploaded a sketch and watched an LED blink. This explains what was actually happening, because almost every confusing moment later comes from a wrong mental picture of it.
There is no reading to do at a bench for this one. It takes about twenty minutes and will save you several hours.
Before you begin
Have a board plugged in and the Arduino IDE open, so you can try the small experiments as you go. Everything here applies to an Arduino Uno and the ATmega328P chip at its centre.
It is not a small computer
A laptop runs an operating system, which starts and stops programs, shares the processor between them, and keeps running when a program ends.
An Arduino has none of that. One program is stored on the chip, and it starts the instant the board receives power. There is nothing underneath it, nothing beside it, and nothing to return to when it finishes. That is why your program never ends. If it did, the chip would have nothing to do.
This is a feature, not a limitation. The board does exactly one job, starts in under a second, and behaves identically every time it is switched on.
Where your program lives
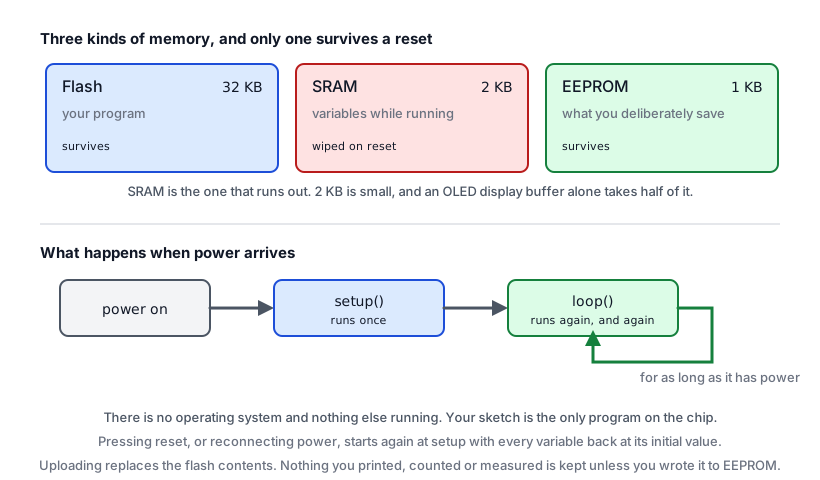
The ATmega328P has three kinds of memory, and knowing which is which explains a whole class of bugs.
| Memory | Size on an Uno | Holds | On power loss |
|---|---|---|---|
| Flash | 32 KB, around 0.5 KB used by the bootloader | Your compiled program | Kept |
| SRAM | 2 KB | Variables while the program runs | Lost |
| EEPROM | 1 KB | Small values you deliberately save | Kept |
Your sketch goes into flash. Every variable it uses lives in SRAM, which is why a counter starts again at zero when you unplug the board, and why storing long text can quietly exhaust a board long before the program itself is too big.
setup() and loop()
Every sketch has these two functions, and the reason is simple. Hidden inside the Arduino core is roughly this:
int main() {
  init();    // Sets up timers and the hardware the core depends on.
  setup();   // Your code, run once.

  for (;;) {
    loop();  // Your code, run again and again, forever.
  }
}
That is the whole model. setup() runs once, for the things that only need doing once: setting pin directions, opening the serial link, starting a library. Then loop() is called over and over, as fast as the chip can manage, until the power goes.
A 16 MHz Uno runs sixteen million basic operations per second. An empty loop() runs tens of thousands of times a second, which is why anything you want to happen at a human pace needs timing of some kind.
One thing at a time
The chip executes one instruction, then the next. Nothing happens in parallel.
This is the single most useful fact in the whole library, because it explains delay(). When you write delay(1000), the chip is not waiting in the background. It is stuck, counting, doing nothing else at all. A button pressed during that second is not noticed, not queued, and not remembered.
void loop() {
  digitalWrite(ledPin, HIGH);
  delay(1000);                 // Nothing else can happen for a full second.
  digitalWrite(ledPin, LOW);
  delay(1000);                 // Nor here.
}
For a blinking light that is fine. For anything that has to react, it is not, and the fix is a tutorial of its own later in this library.
What uploading does
When you click Upload, four things happen in order.
- The IDE compiles your sketch into machine code for the ATmega328P, and reports any mistakes instead of continuing.
- It resets the board over the USB connection.
- A small program called the bootloader, already in flash, runs first on reset. For a moment it listens on the serial line to see whether a new sketch is arriving.
- If one is, the bootloader writes it into flash and then starts it. If not, it steps aside and the sketch already there runs.
That brief listening window is why uploads sometimes fail when the serial port is busy, and why a board with a damaged bootloader has to be reprogrammed with separate hardware.
What reset does, and does not do
Pressing the reset button starts your program again from the first line of setup(). Variables in SRAM go back to their initial values.
It does not erase your sketch. Flash keeps its contents with the power off and through any number of resets. The only way to change the program is to upload another one.
What a pin really is
A digital pin is a physical connection to the chip that can be switched between two jobs.
- As an output, the chip connects the pin either to 5 V or to ground, so it can push a small current into something.
- As an input, the pin is left high-impedance and the chip simply measures whether the voltage on it is nearer 5 V or nearer 0 V.
pinMode() is what chooses between those, and it is why an output pin driving nothing is harmless while an input pin connected to nothing reads unpredictable nonsense. There is no voltage on it to measure.
Check yourself
Answer these before moving on. If one of them is not obvious, read that section again.
- You unplug the board mid-count and plug it back in. What does the counter show?
- Your sketch calls
delay(5000)and you press a button after two seconds. Does the program see the press? - You press reset. Is the sketch still on the board?
- Why does
setup()not need to be called from anywhere in your code?
Next steps
- Easier first: Getting Started with Arduino Uno, if you have not uploaded anything yet.
- Next: Voltage, Current and Resistance, which covers the electrical side of the same picture.
- Later: timing without
delay(), once you have built something that needs to react while it waits.
Sources and attribution
All text and code in this tutorial are original Siratek work.
- ATmega328P datasheet, for memory sizes and clock speed.
- Arduino core source and documentation, for the
main()structure and the bootloader’s role.
No third-party tutorial text, diagrams, photographs or code has been reproduced here.