

01
Nov
Bluetooth Serial with an HC-05
Draft. This tutorial has not been checked against the physical product yet. Confirm wiring, pin assignments and voltage limits against the product documentation before building it.
| Difficulty | Intermediate |
|---|---|
| Category | Communication |
| Supported boards | Arduino Uno R3 and compatible ATmega328P boards |
| Time needed | 55 minutes |
| Prerequisites | Mixing 3.3 V and 5 V Safely |
| Tested board | Not yet verified |
| Tested on | Not yet verified |
| Arduino IDE version | Not yet verified |
| Library | Not yet verified |
What it does
An HC-05 makes a wireless serial link. Pair a phone or a laptop with it, open a terminal app, and whatever you type arrives at the Arduino exactly as if it came down the USB cable. Whatever the Arduino prints goes the other way.
That is the whole idea, and its simplicity is the appeal: no new protocol to learn. If you can use Serial, you can use this.
It is the easy way to control a project from a phone without writing an app or setting up Wi-Fi. It is also classic Bluetooth, not Bluetooth Low Energy, which has one consequence worth knowing before you buy: it does not work with iPhones. Android and desktop only.
Before you begin
Required parts and tools
- An Arduino Uno or compatible board.
- One HC-05 module. This is Siratek product 2621.
- Two resistors, 1 kilohm and 2 kilohms, or a logic level converter.
- An Android phone or a laptop with Bluetooth, and a serial terminal app.
The RXD pin is the thing to get right
The HC-05’s module is a 3.3 V device. Its TXD output is about 3.3 V, which an Uno reads as HIGH without any trouble.
Its RXD input is not 5 V tolerant. Connecting the Uno’s TX pin straight to it puts 5 V on a 3.3 V input. Many modules survive this for a while, which is why so many wiring diagrams show it, and some die quickly.
So: TXD to the Uno needs nothing. The Uno to RXD needs a divider.
A 1 k and 2 k divider is enough: Uno TX through 1 k to the module’s RXD, and 2 k from that junction to ground. That gives about 3.3 V. Mixing 3.3 V and 5 V Safely covers why, and a converter module does the same job more tidily.
Four pins, and what that means for AT mode
The Siratek part’s photographs show a four-pin header: VCC, GND, TXD, RXD.
Some HC-05 breakouts have six, adding STATE and EN or KEY. The KEY pin is how you put the module into AT command mode, where you can change its name, its PIN and its baud rate.
With four pins you do not have that, so the module’s defaults are what you get, which for most projects is fine: it works as a transparent serial link out of the box. If you need to rename it or change the PIN, you would have to solder to the KEY pad on the module itself.
Check your own board. If it has six pins, AT mode is straightforward and worth learning.
Default settings on these modules are typically: name HC-05, PIN 1234 or 0000, and 9600 baud in data mode.
Do not use pins 0 and 1
The Uno’s hardware serial is on pins 0 and 1, shared with the USB connection.
Put the HC-05 there and two things break: you cannot use the serial monitor to debug, and uploading a sketch fails because the module is talking over the upload.
Use SoftwareSerial on two other pins instead. It is slower and perfectly adequate at 9600, and it leaves the USB serial free for watching what is happening.
HC-05 or HC-06
They look identical. The difference is that an HC-05 can be master or slave, while an HC-06 is slave only.
For talking to a phone, slave is all you need and either works. For two Arduinos talking to each other, one has to be a master, which means an HC-05 and access to AT mode.
A note on security
The pairing PIN is four digits and often left at the default. Anyone within range who guesses it can send your project whatever they like.
For a toy or a robot that does not matter. For anything that switches a real load, it should: the Bluetooth link is not an access control, and your sketch should refuse commands that would be dangerous if sent by a stranger.
Pin reference
| Module pin | Connect to | Purpose | Notes |
|---|---|---|---|
VCC |
Uno 5V |
Power | The board has its own regulator |
GND |
Uno GND |
Ground | |
TXD |
Uno D10 |
Module out, Arduino in | Direct; 3.3 V reads fine |
RXD |
Uno D11 through a divider |
Module in, Arduino out | 1 k and 2 k, or a converter |
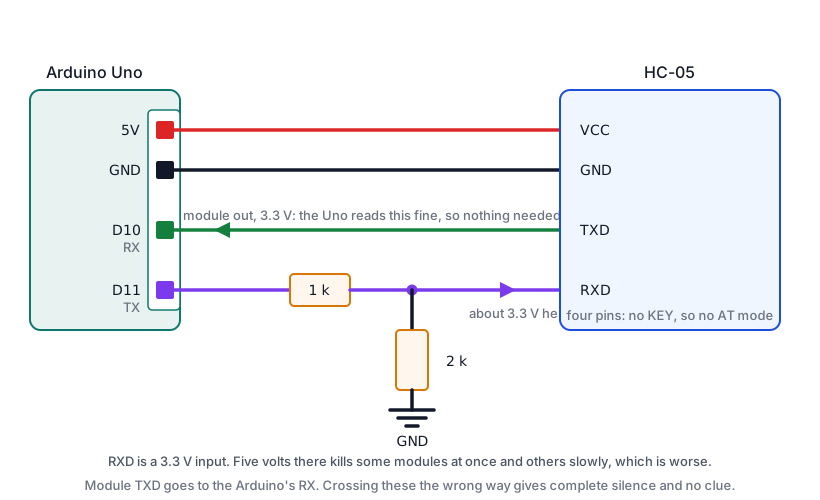
Wiring steps
- Unplug the USB cable.
GNDtoGND,VCCto5V.- Module
TXDstraight toD10. - From
D11, a 1 k resistor to a free breadboard row. From that row, a 2 k resistor toGND. Connect the module’sRXDto that same row. - Plug the USB cable back in. The module’s LED should blink quickly, about twice a second, which means it is unpaired and waiting.
Software and libraries
SoftwareSerial comes with the IDE. Nothing to install on the Arduino side.
On the phone, any Bluetooth serial terminal app will do. On a laptop, pairing creates a serial port you can open with the Arduino IDE’s own serial monitor.
Minimal working example
// Siratek: a Bluetooth serial link, echoing both ways.

#include <SoftwareSerial.h>

// RX pin, TX pin, from the Arduino's point of view.
SoftwareSerial bluetooth(10, 11);

void setup() {
  Serial.begin(9600);
  bluetooth.begin(9600);

  Serial.println("Siratek: pair with HC-05, then type in the phone app.");
  bluetooth.println("Siratek: connected.");
}

void loop() {
  // From the phone to the serial monitor.
  if (bluetooth.available()) {
    char c = bluetooth.read();
    Serial.write(c);
  }

  // From the serial monitor to the phone.
  if (Serial.available()) {
    char c = Serial.read();
    bluetooth.write(c);
  }
}
SoftwareSerial(10, 11) is receive first, then transmit, from the Arduino’s point of view. So pin 10 is the Arduino’s RX and connects to the module’s TXD. Getting those crossed is the most common wiring error with any serial device, and the symptom is complete silence.
Pairing the first time asks for the PIN, usually 1234. Once paired, the module’s LED changes from fast blinking to a slow double flash.
Taking commands
Echoing is a test. Acting on commands is the point.
// Siratek: simple commands over Bluetooth, one per line.

#include <SoftwareSerial.h>

SoftwareSerial bluetooth(10, 11);

const int ledPin = 8;
String line = "";

void handle(String command) {
  command.trim();
  command.toLowerCase();

  if (command == "on") {
    digitalWrite(ledPin, HIGH);
    bluetooth.println("ok, on");
  } else if (command == "off") {
    digitalWrite(ledPin, LOW);
    bluetooth.println("ok, off");
  } else if (command == "status") {
    bluetooth.print("led is ");
    bluetooth.println(digitalRead(ledPin) ? "on" : "off");
  } else if (command.length() > 0) {
    bluetooth.print("unknown command: ");
    bluetooth.println(command);
  }
}

void setup() {
  pinMode(ledPin, OUTPUT);
  Serial.begin(9600);
  bluetooth.begin(9600);
  bluetooth.println("Siratek: try on, off or status.");
}

void loop() {
  while (bluetooth.available()) {
    char c = bluetooth.read();

    if (c == '\n' || c == '\r') {
      handle(line);
      line = "";
    } else if (line.length() < 32) {
      line += c;
    }
    // Anything past 32 characters is dropped rather than growing without limit.
  }
}
Three things make this better than it looks.
It replies to everything, including commands it does not know. A link that stays silent when you make a typo is indistinguishable from a broken one.
The line length is capped. Without the limit, a stream of characters with no newline grows the String until the Uno runs out of RAM and behaves strangely. Bounding input is the same habit as in the keypad tutorial.
Commands are trimmed and lowercased, because phone keyboards add capitals and terminal apps send different line endings. Being forgiving here removes a whole category of “it does not work”.
Speed, and why 9600
SoftwareSerial works by timing bits in software, with interrupts disabled while it does. At 9600 that is reliable. At 115200 on an Uno it drops characters, and at any speed it cannot send and receive at the same time.
If a project needs more, that is an argument for a Mega with its four hardware ports, or an ESP32, whose Bluetooth is built in and needs no module at all.
Expected result
The module’s LED blinking quickly when unpaired, and settling to a slower double flash once a phone connects. Characters typed in the phone app appearing in the serial monitor, and the reverse.
Note that pairing and connecting are different steps. A paired module still blinks fast until an app actually opens the connection.
Troubleshooting
| Symptom | Likely cause | Check or fix |
|---|---|---|
| Nothing at all, LED blinking | Paired but not connected | Open the serial terminal app |
| No LED | VCC or GND |
Check both |
| Nothing received, nothing sent | TX and RX not crossed | Module TXD to Arduino RX |
| Phone sends, Arduino never replies | RXD wiring, or the divider |
Check the junction reads about 3.3 V |
| Module worked, then stopped | 5 V on RXD over time |
Fit the divider |
| Garbled characters | Baud mismatch | 9600 both ends |
| Upload fails with it connected | Module on pins 0 and 1 | Move to SoftwareSerial pins |
| Serial monitor unusable | Same cause | Same fix |
| Will not pair with an iPhone | HC-05 is classic Bluetooth | Use an ESP32 for BLE |
| Cannot change the name | No KEY pin on a four-pin board |
The defaults are what you get |
| Sketch freezes after a long message | String grew without limit |
Cap the line length |
Next steps
- Easier first: Mixing 3.3 V and 5 V Safely, for why the divider is there.
- Related: ESP32, Your First Wi-Fi Project, which needs no module and does BLE too.
- Next project: a phone-controlled robot, with the L298N tutorial driving the motors.
Sources and attribution
All text, wiring guidance and code in this tutorial are original Siratek work.
- HC-05 module documentation for the default baud rate, the pairing PIN and the LED behaviour.
- The four-pin
VCC GND TXD RXDheader was read from the Siratek product photographs for item 2621, which is what establishes that AT command mode is not readily available on this board.
Default name, PIN and baud rate vary between batches and are given as typical values. The note about iPhones follows from classic Bluetooth serial not being supported on iOS. No third-party tutorial text, diagrams, photographs or code has been reproduced here.