

01
Nov
Waterproof Temperature with DS18B20
Draft. This tutorial has not been checked against the physical product yet. Confirm wiring, pin assignments and voltage limits against the product documentation before building it.
| Difficulty | Intermediate |
|---|---|
| Category | Sensors |
| Supported boards | Arduino Uno R3 and compatible ATmega328P boards |
| Time needed | 50 minutes |
| Prerequisites | Read Temperature and Humidity with DHT11 |
| Tested board | Not yet verified |
| Tested on | Not yet verified |
| Arduino IDE version | Not yet verified |
| Library | Not yet verified |
What it does
A DS18B20 in a stainless steel probe on the end of a cable. It reads from about -55 to +125 degrees Celsius to a tenth of a degree, and the sealed tip means it can go into soil, a tank, a fermenter or a fridge.
It is a better sensor than the DHT11 in every way that matters for temperature: more accurate, much wider range, and it does not have to be kept dry. It also introduces something new, because it speaks 1-Wire, a protocol where data and the clock share a single line, and many devices share that one line.
Before you begin
Required parts and tools
- An Arduino Uno or compatible board.
- One waterproof DS18B20 probe. This is Siratek product 49704.
- One 4.7 kilohm resistor. The sensor will not work without it, and one is not supplied.
- A breadboard and three jumper wires.
Three bare wires
The Siratek part is a probe with a one-metre cable ending in three tinned wires, no connector and no breakout board:
| Wire | Function |
|---|---|
| Red | VDD, 3.0 to 5.5 V |
| Yellow | DQ, the data line |
| Black | GND |
Colours are near-universal on these probes but not guaranteed. If yours differ, the data wire is the one that is neither red nor black.
Bare wire ends do not sit reliably in a breadboard. Tin them, fit a short length of solid-core wire, or use a small screw terminal. A probe that works when you hold the wires and fails when you let go is a connection problem, not a sensor problem.
The pull-up resistor, which is the whole trick
1-Wire works by letting every device pull a single shared line down, and nothing ever drives it up. The line is held high by one resistor, and any device can win by pulling it low.
That resistor is not in the probe. You have to fit it: 4.7 kilohms between the yellow data wire and the red power wire.
Leave it out and the data line floats. The sensor is found inconsistently or not at all, and the library returns -127.00, which is its code for “no reply”. Almost every “my DS18B20 reads -127” is this.
A second value worth knowing: 85.00 means the sensor powered up and was read before it finished its first conversion. That one is usually a timing or power problem rather than wiring.
Why one line can hold many sensors
Every DS18B20 leaves the factory with a unique 64-bit address burnt into it. Because each one answers only to its own address, you can connect a dozen probes to the same pin with the same one resistor, and read them individually.
That is genuinely useful: a tank with probes at three depths costs you one Arduino pin. The example below starts with one, then shows how to find and read several.
Pin reference
| Wire | Connect to | Purpose | Notes |
|---|---|---|---|
| Red | Uno 5V |
Power | 3.3 V works too |
| Yellow | Uno D2, and through 4.7 k to 5V |
Data | The resistor is required |
| Black | Uno GND |
Ground |
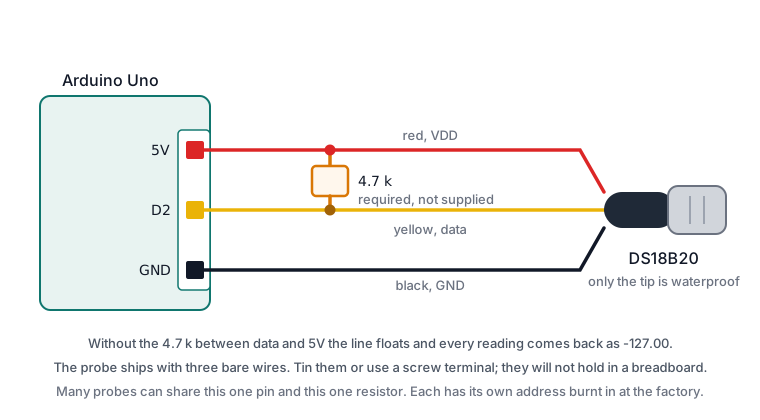
Wiring steps
- Unplug the USB cable.
- Put the three wire ends into three separate breadboard rows.
- Red to
5V. - Black to
GND. - Yellow to
D2. - Fit the 4.7 k resistor between the yellow wire’s row and the
5Vrail. - Check that the resistor really bridges data and power. This is the step people skip.
- Plug the USB cable back in.
Software and libraries
Install two libraries through Library Manager:
- OneWire, which handles the protocol.
- DallasTemperature, which turns it into readable calls.
The second needs the first. Install OneWire too if Library Manager does not bring it along.
Minimal working example
// Siratek: reading one DS18B20 probe.

#include <OneWire.h>
#include <DallasTemperature.h>

const int oneWirePin = 2;

OneWire oneWire(oneWirePin);
DallasTemperature sensors(&oneWire);

void setup() {
  Serial.begin(9600);
  sensors.begin();

  Serial.print("Siratek: found ");
  Serial.print(sensors.getDeviceCount());
  Serial.println(" sensor(s).");
}

void loop() {
  sensors.requestTemperatures();
  float c = sensors.getTempCByIndex(0);

  if (c == DEVICE_DISCONNECTED_C) {
    Serial.println("no reply. Check the 4.7k pull-up.");
  } else {
    Serial.print("temperature = ");
    Serial.print(c, 1);
    Serial.println(" C");
  }

  delay(1000);
}
The device count printed in setup() is the first thing to look at. Zero means the wiring is wrong, almost always the resistor, and no amount of reading further output will help.
Checking against DEVICE_DISCONNECTED_C rather than printing whatever arrives is worth the two lines. It turns a mysterious -127.00 into a sentence that names the cause.
Several probes on one pin
// Siratek: reading every DS18B20 on the line.

#include <OneWire.h>
#include <DallasTemperature.h>

OneWire oneWire(2);
DallasTemperature sensors(&oneWire);

int count = 0;

void setup() {
  Serial.begin(9600);
  sensors.begin();
  count = sensors.getDeviceCount();

  Serial.print("Siratek: ");
  Serial.print(count);
  Serial.println(" probe(s) on the line.");
}

void loop() {
  sensors.requestTemperatures();

  for (int i = 0; i < count; i++) {
    Serial.print("probe ");
    Serial.print(i);
    Serial.print(" = ");
    Serial.print(sensors.getTempCByIndex(i), 1);
    Serial.println(" C");
  }

  Serial.println();
  delay(2000);
}
One warning about getTempCByIndex(): the index is the order the library discovered the devices in, which depends on their addresses, not on where they are in your tank. Add a probe and the numbering can change.
For anything permanent, read each sensor’s address once with getAddress(), write those addresses into your sketch, and read by address. Then “probe 0” means the probe you meant.
Why reading takes time
requestTemperatures() waits while the sensor converts. At the default 12-bit resolution that is up to 750 milliseconds, during which your sketch does nothing else.
Three quarters of a second is a long time in a loop that is also watching a button. The fixes, in order of effort: lower the resolution with setResolution(9), which takes about 94 ms and gives half a degree instead of a sixteenth; or call setWaitForConversion(false) and collect the reading on a later pass, using the pattern from Timing Without delay().
For a thermometer that updates once a second, leave it alone.
Expected result
A device count of 1 in setup(), then a temperature once a second to one decimal place.
Hold the metal tip between your fingers and the reading should climb within a few seconds. It will not jump instantly: the steel sheath has to warm up first, and that thermal lag is real and worth knowing about if you are measuring something that changes quickly.
Troubleshooting
| Symptom | Likely cause | Check or fix |
|---|---|---|
| Reads -127.00 | No pull-up resistor | 4.7 k between the data wire and 5V |
| Found 0 sensors | Same, or data on the wrong pin | Check the resistor, then the pin number |
| Reads 85.00 | Read before the first conversion finished | Check power; let requestTemperatures() complete |
| Works when held, fails when let go | Bare wires not seated | Tin the ends or use a screw terminal |
| Readings jump between two values | Loose connection, or a long unshielded cable | Reseat; try 2.2 k for a long run |
| One of several probes disappears | Index order changed | Read by address, not by index |
| Sketch feels sluggish | 750 ms conversion time | Lower the resolution, or do not block |
| Compile error about OneWire | Library missing | Install OneWire as well as DallasTemperature |
| Reading is right but slow to change | Thermal mass of the steel tip | Expected; allow it to settle |
| Reads correctly in air, wrongly in water | Cable entry not sealed | Only the tip is waterproof; keep the joint dry |
Next steps
- Easier first: Read Temperature and Humidity with DHT11, which needs no extra resistor.
- Related: I2C, Two Wires and Many Devices, to compare how the two shared buses address devices.
- Next project: a standalone data logger, writing temperature and a timestamp to an SD card.
Sources and attribution
All text, wiring guidance and code in this tutorial are original Siratek work.
- Maxim DS18B20 datasheet for the temperature range, the 64-bit address, the conversion times at each resolution and the recommended pull-up value.
- DallasTemperature and OneWire library documentation for the calls used.
The probe described here has three bare wires and no breakout board, read from the Siratek product photograph for item 49704, which is why the pull-up resistor is treated as a required part rather than an optional one. Wire colours are near-universal on these probes but the reader is told what to do if theirs differ. No third-party tutorial text, diagrams, photographs or code has been reproduced here.