

01
Nov
Pressure and Altitude with a BMP280
Draft. This tutorial has not been checked against the physical product yet. Confirm wiring, pin assignments and voltage limits against the product documentation before building it.
| Difficulty | Advanced |
|---|---|
| Category | Sensors |
| Supported boards | Arduino Uno R3 and compatible ATmega328P boards |
| Time needed | 55 minutes |
| Prerequisites | I2C, Two Wires and Many Devices |
| Tested board | Not yet verified |
| Tested on | Not yet verified |
| Arduino IDE version | Not yet verified |
| Library | Not yet verified |
What it does
A barometer on a chip. It measures atmospheric pressure to a fraction of a hectopascal, and temperature alongside it, over I2C or SPI.
Pressure is more useful than it sounds. It tells you about weather, because a falling barometer precedes bad weather and a rising one clearing skies. And because pressure falls predictably with height, it tells you about altitude, finely enough to notice one floor of a building.
This is the first sensor in the library that is genuinely 3.3 volt only, and that is the thing to get right before anything else.
Read this before you connect it
The Siratek part is the small GY-BMP280 board, and the product photographs show what is on it: the sensor, four 103 resistors which are the pull-ups, and no voltage regulator and no level shifter.
That means the module is 3.3 V only. The BMP280’s absolute maximum supply is 4.3 V, and its pins are not 5 V tolerant.
So:
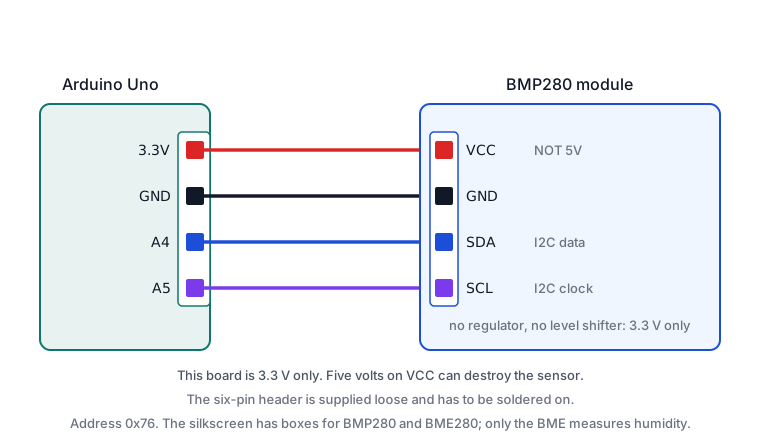
VCCgoes to the Uno’s3.3Vpin, never5V. Five volts there can destroy the sensor, sometimes immediately, sometimes after it has worked for a while.- The I2C lines need thought too. I2C is open-drain, and the bus is pulled up by those
103resistors to whateverVCCis, so withVCCat 3.3 V the bus idles at 3.3 V, which an Uno reads as HIGH quite happily. - However, the AVR Arduino core has long enabled the ATmega’s own internal pull-ups on
A4andA5insideWire.begin(), and those go to 5 V. In practice that drags the bus a few tenths of a volt over the chip’s limit, and in practice most people get away with it for a long time.
“Most people get away with it” is not engineering. For a project you intend to keep:
- Use a logic level converter between the Uno and the module, or
- Use a 3.3 V board such as an ESP32, where the problem does not arise, or
- Accept that you are running the part out of specification and that it may fail early.
This page wires it directly to a 3.3 V supply, because that is what the reader has in front of them, and says plainly what the compromise is.
Note also that many boards sold with this chip do carry a regulator and level shifting, and those are safe on 5 V. Look for a three-pin regulator package. This one has none.
Before you begin
Required parts and tools
- An Arduino Uno or compatible board.
- One BMP280 module. This is Siratek product 2910.
- A soldering iron. The six-pin header is supplied loose and has to be soldered on.
- Four jumper wires, and ideally a logic level converter.
BMP280 or BME280
Look closely at the silkscreen. These boards are printed with two tick boxes, BMP280 and BME280, because the same PCB is used for both chips.
The difference matters: the BME280 also measures humidity; the BMP280 does not. Siratek product 2910 is the BMP280, so a sketch that asks for humidity will not compile or will return nothing.
If your board has the BME280 box marked, you have the better chip and should use the BME280 library instead.
Six pins, two protocols
VCC, GND, SCL/SCK, SDA/SDI, CSB, SDO. Four of them are I2C; all six are SPI.
For I2C you leave CSB and SDO alone, and the board’s pull-ups put the chip at address 0x76. Tying SDO high moves it to 0x77, which is how two of these share one bus.
Note that 0x76 and 0x77 are distinct from the DS3231’s 0x68 and from a display’s 0x3C or 0x27, so a weather station with a clock and a screen has no address clash.
What the numbers mean
Pressure arrives in pascals. Divide by 100 for hectopascals, which is what weather forecasts use. Sea level is around 1013 hPa.
Altitude is calculated, not measured. The library works it out from the pressure, assuming a sea-level reference. If you feed it the standard 1013.25 when the real local sea-level pressure is 1020, your altitude comes out roughly sixty metres wrong, and it changes with the weather.
So the absolute altitude figure is only as good as the reference you give it. Changes in altitude are reliable; the absolute number is not, unless you look up the local pressure first.
That is worth knowing before you build an altimeter and conclude the sensor is faulty.
Pin reference
| Module pin | Connect to | Purpose | Notes |
|---|---|---|---|
VCC |
Uno 3.3V |
Power | Never 5V |
GND |
Uno GND |
Ground | |
SCL |
Uno A5 |
I2C clock | Through a level converter for anything permanent |
SDA |
Uno A4 |
I2C data | Same |
CSB |
Not connected | Chip select, for SPI | Pulled up on the board |
SDO |
Not connected | Address select | Leave it for 0x76 |
Wiring steps
- Unplug the USB cable.
- Solder the supplied six-pin header to the board.
GNDtoGND.VCCto3.3V. Check this twice. It is the step that destroys the sensor.SDAtoA4,SCLtoA5, through a level converter if you have one.- Leave
CSBandSDOunconnected. - Plug the USB cable back in and run the bus scanner. Expect 0x76.
Software and libraries
Install Adafruit BMP280 Library and Adafruit Unified Sensor through Library Manager.
Minimal working example
// Siratek: pressure, temperature and altitude from a BMP280.

#include <Wire.h>
#include <Adafruit_BMP280.h>

Adafruit_BMP280 bmp;

// Look up your local sea-level pressure for a meaningful altitude.
// 1013.25 is the standard atmosphere, not your weather today.
const float seaLevelHpa = 1013.25;

void setup() {
  Serial.begin(9600);
  while (!Serial) {
    ;
  }

  if (!bmp.begin(0x76)) {
    Serial.println("Siratek: no BMP280 at 0x76. Try 0x77, and check VCC is on 3.3V.");
    while (1) {
      delay(100);
    }
  }

  Serial.println("Siratek: BMP280 ready.");
}

void loop() {
  Serial.print("pressure = ");
  Serial.print(bmp.readPressure() / 100.0F, 2);
  Serial.print(" hPa   temperature = ");
  Serial.print(bmp.readTemperature(), 1);
  Serial.print(" C   altitude = ");
  Serial.print(bmp.readAltitude(seaLevelHpa), 1);
  Serial.println(" m");

  delay(2000);
}
Two decimal places on the pressure is not showing off. The sensor really does resolve that finely, and you need it for the next example.
Seeing it work
Two demonstrations make this sensor click, and both take a minute.
Lift it. Hold the board at floor level, note the pressure, then stand on a chair. The reading should fall by around 0.3 hPa for three metres. That is the sensor detecting that you moved it upward by the height of a room.
Breathe near it, gently, from a distance. Not onto it: a puff of breath changes the temperature and condenses on the chip. A gentle air current nearby is enough to move the last digit.
Weather, which needs patience
// Siratek: is the barometer rising or falling?

#include <Wire.h>
#include <Adafruit_BMP280.h>

Adafruit_BMP280 bmp;

const unsigned long interval = 600000UL;   // ten minutes
const int historyLength = 18;              // three hours of samples

float history[historyLength];
int count = 0;
unsigned long lastSample = 0;

void setup() {
  Serial.begin(9600);
  bmp.begin(0x76);
  lastSample = millis() - interval;
}

void loop() {
  if (millis() - lastSample < interval) {
    return;
  }
  lastSample = millis();

  float hpa = bmp.readPressure() / 100.0F;

  // Shift the history along and add the newest sample.
  for (int i = historyLength - 1; i > 0; i--) {
    history[i] = history[i - 1];
  }
  history[0] = hpa;
  if (count < historyLength) {
    count++;
  }

  Serial.print("pressure = ");
  Serial.print(hpa, 2);

  if (count == historyLength) {
    float change = history[0] - history[historyLength - 1];
    Serial.print("   three-hour change = ");
    Serial.print(change, 2);
    Serial.print(" hPa  ");

    if (change < -1.5) {
      Serial.println("falling: weather likely deteriorating");
    } else if (change > 1.5) {
      Serial.println("rising: weather likely improving");
    } else {
      Serial.println("steady");
    }
  } else {
    Serial.println("   collecting history");
  }
}
The three-hour window is the one meteorologists use, and the 1.5 hPa figure is a conventional threshold for a significant change. Neither is something the sensor knows; they are how the reading is interpreted.
This sketch tells you nothing for three hours. That is honest rather than a bug, and it is why the output says so while it waits.
Expected result
A pressure near 1000 hPa, a temperature a little above the room, and an altitude figure that is plausible only if you supplied a sensible reference.
The pressure should be steady to within a few hundredths while the sensor sits still, and should visibly fall as you lift it.
Troubleshooting
| Symptom | Likely cause | Check or fix |
|---|---|---|
| Nothing found on the bus | VCC not connected, or header not soldered |
Check both |
| Found at 0x77, not 0x76 | SDO pulled high |
Use 0x77 in begin() |
| Sensor dead after working briefly | 5 V applied to VCC |
This board is 3.3 V only |
| Looking for humidity | That is the BME280 | Check the tick box on the silkscreen |
| Altitude is tens of metres out | Sea-level reference is wrong | Look up the local pressure |
| Altitude drifts over a day | Weather is changing the pressure | Expected; altitude is inferred |
| Temperature reads high | Self-heating | Normal, a degree or two |
| Readings jitter in the last digit | Genuine resolution | Average several if it bothers you |
| Works on an ESP32, not an Uno | Logic levels | Use a level converter on the Uno |
| Address clash suspected | 0x76 is distinct from the clock and displays | Scan to confirm |
Next steps
- Easier first: I2C, Two Wires and Many Devices, for the bus and the scanner.
- Related products: the DHT22 for humidity, which this chip does not measure.
- Next project: a mini weather station: BMP280 for pressure, DHT22 for humidity, OLED to show both, and an SD card for the history.
Sources and attribution
All text, wiring guidance and code in this tutorial are original Siratek work.
- BMP280 datasheet for the supply limits, the I2C addresses and the pressure and temperature specifications.
- Adafruit BMP280 library documentation for the calls used.
- The absence of a regulator and level shifter, the loose six-pin header and the dual
BMP280/BME280silkscreen were read from the Siratek product photographs for item 2910. That is what establishes this board as 3.3 V only.
The three-hour pressure window and the 1.5 hPa threshold are conventional meteorological practice rather than properties of the sensor, and are presented as interpretation. No third-party tutorial text, diagrams, photographs or code has been reproduced here.