

01
Nov
Seeing What Your Program Is Doing
Draft. This tutorial has not been checked against the physical product yet. Confirm wiring, pin assignments and voltage limits against the product documentation before building it.
| Difficulty | Beginner |
|---|---|
| Category | Foundations |
| Supported boards | Arduino Uno R3 and compatible ATmega328P boards |
| Time needed | 25 minutes |
| Prerequisites | How an Arduino Actually Works |
| Tested board | Not yet verified |
| Tested on | Not yet verified |
| Arduino IDE version | Not yet verified |
| Library | Not yet verified |
What this covers
The Serial Monitor is the only window you have into a running sketch. A board gives no error message when something is wrong; it simply does the wrong thing quietly. Printing to serial is how you find out why.
Learning this properly now means every later tutorial can be debugged instead of guessed at.
Before you begin
- A board, a USB data cable, and the Arduino IDE.
- Nothing wired. Everything here uses the board alone.
Opening the link
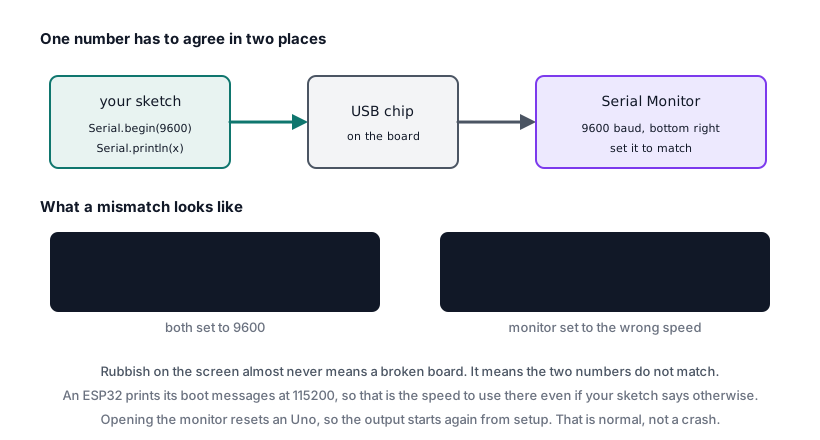
Two things have to agree: the speed your sketch opens the link at, and the speed the Serial Monitor reads it at. Mismatched, you get a screen of meaningless symbols.
void setup() {
  Serial.begin(9600);   // Opens the link at 9600 bits per second.
  Serial.println("Ready.");
}

void loop() {
}
Upload this, then open Tools > Serial Monitor and set the rate selector at the bottom of the window to 9600 baud. You should see Ready. appear once.
It appears once because setup() runs once. If you see it repeatedly, something is resetting the board.
Printing values
Serial.print() writes without moving to a new line. Serial.println() writes and then ends the line. Mixing them is how you build a readable line from several pieces.
int reading = 512;

Serial.print("Sensor: ");
Serial.print(reading);
Serial.println(" counts");
That prints Sensor: 512 counts and ends the line.
The useful habit is to label every value. A screen of bare numbers tells you nothing six lines later when two sensors are printing at once.
Serial.print("temp=");
Serial.print(temperature);
Serial.print(" humidity=");
Serial.println(humidity);
Watching something change
This is the pattern you will use for the rest of the library: read something, print it, pause briefly so the output is readable.
// Siratek: watching a value change over time.

void setup() {
  Serial.begin(9600);
  Serial.println("Siratek: starting.");
}

void loop() {
  int reading = analogRead(A0);   // Nothing connected yet, so this will drift.

  Serial.print("A0 = ");
  Serial.println(reading);

  delay(500);
}
With nothing wired to A0, the numbers will wander unpredictably. That is correct, and it is worth seeing: an input pin with nothing connected has no defined voltage to measure, so it reports noise. A reading that drifts like this in a real project usually means a wire has come off.
Printing costs time
Serial output is slow compared to everything else the chip does. At 9600 baud a single character takes about a millisecond, so a line of forty characters holds the program up for roughly four milliseconds.
That does not matter when you print twice a second. It matters a great deal inside a loop that needs to run quickly, where printing can be the reason the timing looks wrong. If adding a print statement changes the behaviour you were investigating, the printing itself is now part of the problem.
Raising the rate to 115200 in both the sketch and the Serial Monitor makes output roughly twelve times faster, which is the usual answer.
Finding a fault with it
When something does not work, the question is always the same: is the program doing what I think, and is the hardware doing what the program says?
Printing answers the first half. Put a print at each step and watch which ones appear.
void loop() {
  Serial.println("1: about to read");
  int value = analogRead(A0);

  Serial.print("2: read ");
  Serial.println(value);

  if (value > 500) {
    Serial.println("3: above threshold");
    digitalWrite(ledPin, HIGH);
  }

  delay(500);
}
If 3: never appears, the threshold is never crossed and the wiring is the place to look. If it appears and the LED stays dark, the program is right and the fault is after it. That single distinction is most of debugging.
Keep D0 and D1 clear
The USB serial connection uses digital pins 0 and 1. Anything else wired to them fights with it, which shows up as missing output, corrupted output, or uploads that fail.
Leave those two pins alone while you are using the Serial Monitor.
Check yourself
- You see
âñ¿@instead of words. What is wrong? Ready.prints over and over instead of once. What does that suggest?- You add a print inside a fast loop and the timing changes. Why?
- Your print appears but the LED does not light. Which half of the problem is ruled out?
Troubleshooting
| Symptom | Likely cause | Check or fix |
|---|---|---|
| Symbols instead of text | Rate mismatch | Make Serial.begin() and the Serial Monitor agree |
| Nothing at all | No Serial.begin(), or wrong port |
Add it to setup(), then check Tools > Port |
| Output stops after a while | Board resetting, or a crash | Print at the top of setup() to see if it restarts |
| Upload fails with the monitor open | Port already in use | Close the Serial Monitor and upload again |
| Text appears twice | Printing in both setup() and loop() |
Check which one you meant |
| Output garbled only sometimes | Something wired to D0 or D1 |
Move it to another pin |
Next steps
- Easier first: How an Arduino Actually Works.
- Next: Read a Potentiometer, the first tutorial where serial output shows a real value changing.
- Later: Troubleshooting by Symptom, which builds on this habit.
Sources and attribution
All text and code in this tutorial are original Siratek work.
- Arduino core documentation for the
Serialfunctions.
No third-party tutorial text, diagrams, photographs or code has been reproduced here.