

01
Nov
Troubleshooting by Symptom
Draft. This tutorial has not been checked against the physical product yet. Confirm wiring, pin assignments and voltage limits against the product documentation before building it.
| Difficulty | Advanced |
|---|---|
| Category | Foundations |
| Supported boards | Arduino Uno R3 and compatible ATmega328P boards |
| Time needed | 40 minutes |
| Prerequisites | Using a Multimeter |
| Tested board | Not yet verified |
| Tested on | Not yet verified |
| Arduino IDE version | Not yet verified |
| Library | Not yet verified |
What this covers
Every tutorial in this library ends with a troubleshooting table for that part. This page is the one you reach for when you do not know which part is at fault, or when the symptom is the whole project rather than one component.
It is organised by what you are seeing, because that is all you have at the start.
Before you begin
Nothing to wire. This is a page to read once and come back to.
The method, in four steps
Most of the time lost to a fault is lost before any measuring begins, in guessing. The way out is dull and fast.
1. Make it smaller. Disconnect everything that is not needed to reproduce the fault. A project with six modules has six suspects and a great many interactions; the same fault on a board with one sensor has one suspect. This single step finds more faults than everything else on this page.
2. Change one thing at a time. Two changes and a result tell you nothing about either.
3. Prove the thing you assume. You assume the sensor is powered, the pin is connected, the sketch uploaded. Each of those takes ten seconds to check and one of them is usually wrong.
4. Know what “working” looks like before you start. If you do not have a known-good state to return to, you cannot tell progress from coincidence. Upload the blink sketch. If pin 13 blinks, the board, the cable, the port and the toolchain are all fine, and you have ruled out a quarter of everything.
The order to suspect things in
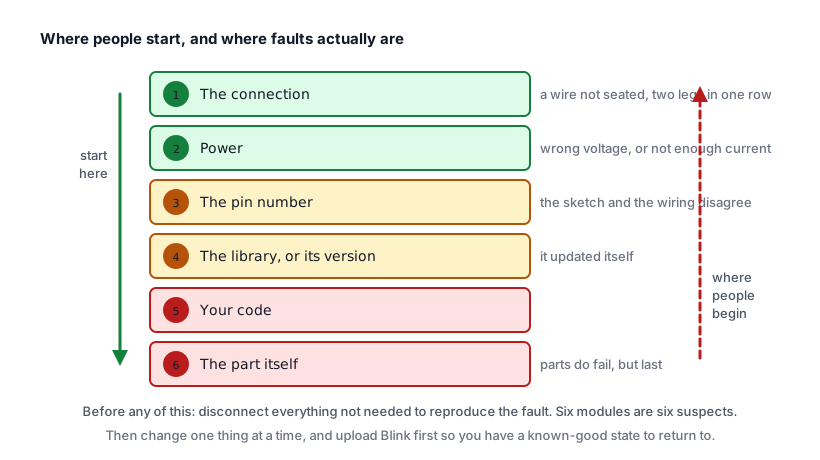
Rough, and right more often than not:
- The connection. A wire not seated, a breadboard row misread, two legs in one row.
- Power. Not connected, the wrong voltage, or not enough current.
- The pin number. The sketch says one thing and the wiring says another.
- The library or its version.
- Your code.
- The part.
People start at five and work up. Start at one and work down.
Nothing happens at all
| What you see | Check, in this order |
|---|---|
| No lights anywhere on the board | The USB cable. Many are charge-only and carry no data |
| Power LED on, nothing else | Did the sketch upload? Upload Blink and see |
| Blink works, your sketch does nothing | Compare the pin numbers in the sketch with the wiring |
| One module dead, others fine | Its power first: measure VCC to GND at the module |
The charge-only cable is worth its own line. It is extremely common, it looks identical to a good one, and the symptom is a board that appears completely dead. Keep one cable you know works and test with that.
It uploads but behaves wrongly
| What you see | Likely cause |
|---|---|
| Output is rubbish characters | Serial monitor baud does not match Serial.begin() |
| Serial output restarts repeatedly | The board is resetting: look at power, not code |
| Works on USB, fails on battery | Supply voltage or current. See Powering Your Project |
| A reading never changes | The pin is not connected to what you think |
| A reading is stuck at 0 or 1023 | The pin is shorted to ground or to the supply |
| A value is a quarter of what it should be | A 12-bit board’s 0 to 4095 fed into 10-bit assumptions |
| Everything slowed down | A delay() somewhere, or a slow sensor read |
The reset that looks like a crash
This one deserves explaining because it is so often misdiagnosed.
A board that browns out and restarts looks exactly like a sketch that crashed: output stops, behaviour resets, sometimes it half-works. The difference is that nothing in your code is wrong.
Prove it in one line. Put this at the top of setup():
Serial.begin(9600);
Serial.println("Siratek: board started");
If that line appears while the project is running, the board is restarting. Stop reading your code and start measuring the supply, especially around whatever moves.
It worked yesterday
| What changed | Where to look |
|---|---|
| Nothing, you say | A library updated itself, or the IDE did |
| You added a module | Current budget, or an I2C address clash |
| You moved it | A wire, nearly always |
| It got warmer or colder | A threshold you measured in different conditions |
| It has been running for days | millis() rollover, or a String fragmenting the heap |
| A card or battery is involved | SD cards and coin cells both fail quietly |
“Nothing changed” is almost never true. Library Manager updates on its own. The usual discipline is to record the version of every library a working project used, which is what Pinning Library Versions is about.
Several devices, one bus
| What you see | Likely cause |
|---|---|
| Each I2C device works alone, not together | Two devices at the same address |
| I2C bus scanner finds nothing at all | SDA and SCL swapped, or no pull-ups |
| An SPI device fails when another is added | Two chip selects on the same pin |
| Adding a display breaks an analog reading | ESP32 ADC2 is unusable with Wi-Fi on |
| Adding a servo breaks PWM on 9 or 10 | Servo has taken Timer1 |
| Adding IR breaks PWM on 3 or 11 | IRremote has taken Timer2 |
The address clash is worth remembering concretely: a DS3231 clock and an MPU-6050 are both at 0x68, and that combination is common in a levelling datalogger. The fix is a pin on the MPU-6050, not a different clock.
Memory, which fails confusingly
An Uno has 2 KB of RAM. When it runs out, nothing says so clearly: the sketch uploads, runs, and then misbehaves in ways that look like unrelated bugs.
| What you see | Suspect memory if |
|---|---|
| Garbled serial output | You added a display or more String use |
| The board resets at random | The IDE warned about low memory |
| A variable has a value nothing assigned | Something wrote past the end of an array |
| Works for hours, then freezes | String concatenation in a loop fragmenting the heap |
Three habits avoid nearly all of it: wrap fixed strings in F(), bound every index before writing to an array, and prefer fixed char buffers with snprintf() over String in anything that runs often.
Measuring instead of guessing
Three measurements settle most arguments, and Using a Multimeter covers all three.
Continuity, with the power off, proves a wire is a wire. Most “dead sensor” faults are a lead not making contact.
Voltage, with the power on, proves the module has what it needs. Measure at the module’s own pins, not at the Arduino, because the interesting failures are in between.
Voltage under load is the one people skip. A 5 V rail that reads 5.0 V idle and 4.1 V when the motor starts has told you exactly what is wrong.
When to suspect the part
Last, and only after the five above. But parts do fail, and these fail in known ways:
- Anything 3.3 V given 5 V: a BMP280, an RC522, an NRF24L01 or an HC-05’s
RXD. Often works for a while first. - Resistive probes left powered in water or damp soil. They corrode.
- SD cards, especially cheap ones, which fail intermittently.
- Coin cells in a clock module, which simply run down.
- Relay contacts, which are consumable.
- Breadboards, whose contacts lose grip. A circuit that works when pressed is a breadboard, not a bug.
Check yourself
- A project with four modules misbehaves. What is the first thing to do?
- Serial output keeps starting again from the beginning. Code or power?
- A clock and an accelerometer each work alone but not together. What is the likely cause?
- A sketch has run for weeks and then freezes. What two things would you suspect?
Answers in order: disconnect everything not needed to reproduce it, until one suspect remains. Power: the board is resetting. Both answer at I2C address 0x68; move one with its address pin. millis() rollover handled by comparison rather than subtraction, or String use fragmenting the heap.
Troubleshooting
| Symptom | Likely cause | Check or fix |
|---|---|---|
| Board appears completely dead | Charge-only USB cable | Try a cable you know carries data |
| Blink works, project does not | Pin numbers, or wiring | Compare the sketch against the board |
| Serial prints rubbish | Baud mismatch | Match Serial.begin() and the monitor |
| Output restarts repeatedly | Brown-out reset | Print from setup(); measure the supply |
| Reading stuck at an extreme | Pin shorted or floating | Measure at the module’s own pins |
| Two I2C devices conflict | Same address | Scan the bus; move one |
| Works when you press on it | Breadboard contact | Reseat, or solder it |
| Fails only under load | Supply sagging | Measure the rail while the load runs |
| Worked yesterday | A library updated | Check versions; pin them |
| Freezes after a long run | Memory fragmentation or rollover | snprintf() into fixed buffers; compare with subtraction |
Next steps
- Easier first: Using a Multimeter, which is the tool this page keeps pointing at.
- Related: Pinning Library Versions, for the “it worked yesterday” class of fault.
- Next: Making a Project Survive Unattended, for faults you will not be present to see.
Sources and attribution
All text and code in this tutorial are original Siratek work. It collects the failure modes described in the individual tutorials in this library and organises them by symptom rather than by component.
No third-party tutorial text, diagrams, photographs or code has been reproduced here.