

01
Nov
Logging Data to an SD Card
Draft. This tutorial has not been checked against the physical product yet. Confirm wiring, pin assignments and voltage limits against the product documentation before building it.
| Difficulty | Intermediate |
|---|---|
| Category | Inputs |
| Supported boards | Arduino Uno R3 and compatible ATmega328P boards |
| Time needed | 60 minutes |
| Prerequisites | Keeping Time with a DS3231 |
| Tested board | Not yet verified |
| Tested on | Not yet verified |
| Arduino IDE version | Not yet verified |
| Library | Not yet verified |
What it does
A micro SD card socket on a small board, so an Arduino can write files. Readings go to a card, the card goes into a computer, and you open the result in a spreadsheet.
This is the piece that turns a sensor project into a measuring instrument. A sensor on the serial monitor tells you what is happening while you watch. A sensor writing to a card tells you what happened to the greenhouse overnight.
Before you begin
Required parts and tools
- An Arduino Uno or compatible board.
- One micro SD card module. This is Siratek product 6573.
- A micro SD card, 32 GB or smaller, formatted FAT32.
- Six jumper wires.
This module is safe on 5 V
Worth stating plainly, because the usual advice about small SD modules is that they are not.
SD cards are 3.3 V devices and an Uno’s pins swing to 5 V, so a bare socket wired straight to an Arduino will eventually damage the card. Many small modules do no conversion at all.
This one does. The board carries a 74LVC125A buffer, which is the level shifter, and a three-pin regulator in a SOT-223 package to make 3.3 V for the card. Both are visible on the board: the buffer is the small chip marked LVC125A beside the socket, the regulator the larger three-legged part with a metal tab.
So connect VCC to the Uno’s 5V pin. The regulator needs the higher voltage to work from; feed it 3.3 V instead and it has nothing to regulate.
If you ever use a different module, look for those two parts before trusting it with a card.
Cards, and why one may simply not work
This is the most common frustration with SD on an Arduino, and it is usually the card rather than anything you did.
- 32 GB or smaller. Larger cards are SDXC and formatted exFAT, which the standard library does not read. A 64 GB card reformatted as FAT32 often works, but a 32 GB card avoids the question.
- FAT32, not exFAT or NTFS. Format it in the computer, and choose FAT32 explicitly.
- Class 4 or 10, a known brand. Very cheap or counterfeit cards fail in ways that look like wiring faults, and they fail intermittently, which is worse.
If a card refuses to initialise, try a different card before changing anything else. It resolves this more often than any other single step.
Filenames must be 8.3
The library uses short DOS-style names: up to eight characters, a dot, up to three more. LOG.CSV and DATA0001.TXT are fine. sensor-readings.csv is not, and the failure is silent: the file is simply never created, and every write succeeds into nothing.
Case is not preserved either. Use capitals and keep to the limit.
The pins it takes, and what that costs
SPI needs four pins, and on an Uno they are fixed: D11, D12 and D13 for data and clock, plus a chip select which can be any pin but conventionally is D10.
That means D10 to D13 are gone, and they are the same pins the MAX7219 tutorial used. Both can share the bus if each has its own chip select, but it is worth knowing before you plan a project around all three.
Power, which is the other common fault
A card can draw a surprising burst of current while writing, up to a hundred milliamps or so. On USB power with nothing else connected, that is fine. Alongside a display and a couple of sensors, it is the thing that makes a board reset mid-write.
A reset mid-write is worse than it sounds, because it can leave the file system damaged rather than just losing a line. The defence is in the code below: open the file, write, close it, every time. A closed file is a safe file.
Pin reference
| Module pin | Connect to | Purpose | Notes |
|---|---|---|---|
GND |
Uno GND |
Ground | |
VCC |
Uno 5V |
Power | The board makes its own 3.3 V |
MISO |
Uno D12 |
Data from the card | |
MOSI |
Uno D11 |
Data to the card | |
SCK |
Uno D13 |
Clock | |
CS |
Uno D10 |
Chip select | Any pin, but the library defaults near this |
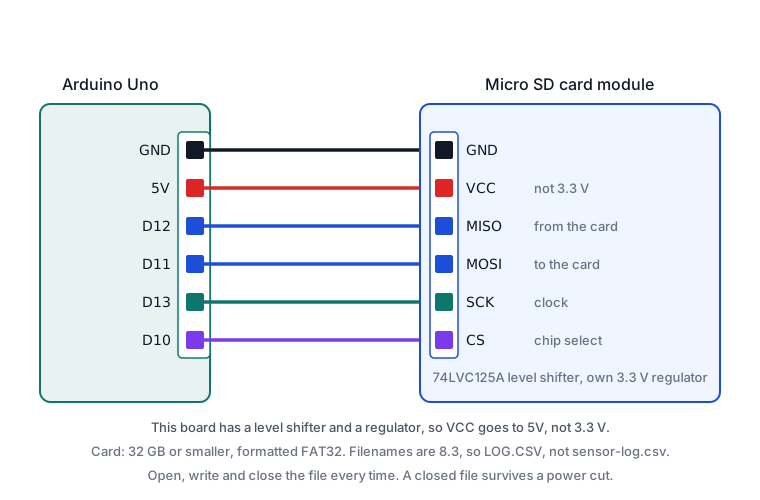
Wiring steps
- Unplug the USB cable.
GNDtoGND,VCCto5V.MISOtoD12,MOSItoD11,SCKtoD13.CStoD10.- Insert a FAT32-formatted card, 32 GB or smaller.
- Plug the USB cable back in.
Keep these leads short. SPI at a few megahertz over long loose jumper wires is a real source of intermittent failures, and the symptom is a card that initialises sometimes.
Software and libraries
SD ships with the Arduino IDE. Nothing to install.
Minimal working example
Prove the card works before writing anything that matters.
// Siratek: confirm the card initialises and list what is on it.

#include <SPI.h>
#include <SD.h>

const int chipSelect = 10;

void setup() {
  Serial.begin(9600);
  while (!Serial) {
    ;
  }

  Serial.print("Siratek: starting the card... ");

  if (!SD.begin(chipSelect)) {
    Serial.println("failed.");
    Serial.println("  Check the card is FAT32 and 32 GB or smaller,");
    Serial.println("  check CS is on pin 10, and try another card.");
    return;
  }

  Serial.println("ready.");

  File root = SD.open("/");
  while (true) {
    File entry = root.openNextFile();
    if (!entry) {
      break;
    }
    Serial.print("  ");
    Serial.print(entry.name());
    Serial.print("  ");
    Serial.println(entry.size());
    entry.close();
  }
  root.close();
}

void loop() {
}
A blank card lists nothing, which is correct. What matters is “ready” rather than “failed”.
Logging readings as CSV
// Siratek: a temperature log with a real timestamp, one line per minute.

#include <SPI.h>
#include <SD.h>
#include <Wire.h>
#include <RTClib.h>

const int chipSelect = 10;
const char* filename = "LOG.CSV";

RTC_DS3231 rtc;

const unsigned long interval = 60000UL;
unsigned long lastWrite = 0;

bool cardReady = false;

void setup() {
  Serial.begin(9600);

  if (!rtc.begin()) {
    Serial.println("Siratek: no clock found.");
  }

  cardReady = SD.begin(chipSelect);
  if (!cardReady) {
    Serial.println("Siratek: no card. Logging disabled, serial only.");
    return;
  }

  // Write a header once, when the file is first created.
  if (!SD.exists(filename)) {
    File f = SD.open(filename, FILE_WRITE);
    if (f) {
      f.println("timestamp,temperature_c");
      f.close();
    }
  }

  lastWrite = millis() - interval;   // log once immediately
}

void logLine(const String& line) {
  Serial.println(line);

  if (!cardReady) {
    return;
  }

  // Open, write, close, every time. A closed file survives a power cut.
  File f = SD.open(filename, FILE_WRITE);
  if (f) {
    f.println(line);
    f.close();
  } else {
    Serial.println("  could not open the file");
  }
}

void loop() {
  if (millis() - lastWrite < interval) {
    return;
  }
  lastWrite = millis();

  DateTime now = rtc.now();
  float temperature = rtc.getTemperature();

  String line = String(now.year()) + "-" +
                String(now.month()) + "-" +
                String(now.day()) + " " +
                String(now.hour()) + ":" +
                String(now.minute()) + ":" +
                String(now.second()) + "," +
                String(temperature, 1);

  logLine(line);
}
Four decisions here are the difference between a logger and a disappointment.
The file is opened and closed around every write. Holding it open is faster and loses everything buffered if power goes. For a reading a minute, the speed does not matter and the safety does.
The sketch keeps working without a card. cardReady means a missing card costs you the log, not the project. A logger that refuses to run because the card is out is worse than one that carries on and tells you.
The header is written only when the file does not yet exist, so restarting the logger appends to the same file rather than scattering headers through it.
It is CSV, which opens directly in any spreadsheet. One line per reading, commas between fields, no quotes needed for plain numbers.
Using String, and when not to
The sketch above builds each line with String, which is readable and fine at one line a minute.
String allocates memory as it goes, and on a board with 2 KB of RAM, repeated allocation gradually fragments the heap. In a loop running many times a second, that ends in a sketch that runs for hours and then freezes.
If you log frequently, build the line into a fixed char buffer with snprintf() instead. For a slow logger, leave it alone and spend the effort elsewhere.
Expected result
“ready” on the serial monitor, a LOG.CSV appearing on the card, and one line added per minute.
Take the card to a computer and open the file in a spreadsheet. The columns should separate automatically, and a chart of the temperature column is about three clicks away. That moment is the point of the whole tutorial.
Troubleshooting
| Symptom | Likely cause | Check or fix |
|---|---|---|
| Initialisation failed | Card too large or wrong format | 32 GB or smaller, FAT32 |
| Initialisation failed, card fine | CS on the wrong pin |
Match the pin in SD.begin() |
| Fails intermittently | Long or loose jumper leads | Shorten and reseat them |
| Fails with one card, works with another | Cheap or counterfeit card | Use a known brand |
| File never appears | Filename longer than 8.3 | LOG.CSV, not sensor-log.csv |
| File exists but is empty | Not closed before power was lost | Close after every write |
| Board resets while writing | Current burst during a write | Check the power budget |
| Card corrupted after a reset | File open when power went | Open, write, close each time |
| Works alone, not with a display | Both on SPI | Separate chip select pins |
| Runs for hours then freezes | String fragmenting the heap |
Use snprintf() into a fixed buffer |
| Timestamps all identical | Clock not set | See Keeping Time with a DS3231 |
Next steps
- Easier first: Keeping Time with a DS3231, which supplies the timestamp.
- Related products: any sensor in this library; the DS18B20 and the DHT11 are the obvious first choices.
- Next project: a standalone data logger, left running for a week, and the chart that comes out of it.
Sources and attribution
All text, wiring guidance and code in this tutorial are original Siratek work.
- The
74LVC125Alevel shifter and the SOT-223 regulator on this module were read from the Siratek product photographs for item 6573, which is what establishes that the board is safe on a 5 V Arduino rather than 3.3 V only. - Arduino
SDlibrary documentation for the 8.3 filename limit and the supported formats.
Card capacity and formatting limits are properties of the standard library rather than of this module. No third-party tutorial text, diagrams, photographs or code has been reproduced here.