

01
Nov
Reading Soil Moisture
Draft. This tutorial has not been checked against the physical product yet. Confirm wiring, pin assignments and voltage limits against the product documentation before building it.
| Difficulty | Beginner |
|---|---|
| Category | Sensors |
| Supported boards | Arduino Uno R3 and compatible ATmega328P boards |
| Time needed | 45 minutes |
| Prerequisites | Measuring Light with an LDR |
| Tested board | Not yet verified |
| Tested on | Not yet verified |
| Arduino IDE version | Not yet verified |
| Library | Not yet verified |
What it does
Two exposed metal tracks on a fork-shaped probe, pushed into soil. Wet soil conducts better than dry soil, so the resistance between the tracks falls as the soil gets wetter, and a small comparator board turns that into something an Arduino can read.
It is the same voltage divider as the LDR, with soil in place of the photoresistor. If you have done that tutorial, the electronics here will already make sense, and this page can spend its time on the two things that actually catch people out: what the sensor really measures, and why it destroys itself if you leave it switched on.
Before you begin
Required parts and tools
- An Arduino Uno or compatible board.
- One soil moisture sensor set. This is Siratek product 2841, which comes as two pieces: the fork probe and a small comparator board, with two jumper leads to join them.
- Four more jumper wires.
The two boards
The probe is the fork with two gold-coloured tracks and a two-pin header marked + and -. It contains no electronics at all. It is two electrodes.
The comparator board is the small blue board carrying an LM393, a blue trimmer, two indicator LEDs and a four-pin header labelled:
AO DO GND VCC
The supplied leads join the probe’s two pins to the two pins on the end of the comparator board. Either way round; the probe has no polarity that matters.
Analog or digital
This board gives you both, and the choice matters more here than anywhere else in the library.
AOis the raw divider voltage. Wetter soil, lower reading, with everything in between.DOis HIGH or LOW depending on whetherAOhas crossed a threshold set by the blue trimmer.
Use AO. Soil is not a consistent material, and “wet enough” depends on your soil, your pot and your plant. The analog reading lets you watch the real numbers and choose a threshold from them. The trimmer makes you guess by eye and hides what is happening.
Fit DO at the end if you need the Arduino pin back. Not before.
What it actually measures
It measures electrical conductivity, not water.
That distinction is not pedantry. Conductivity depends on dissolved salts as well as water, so feeding a plant can raise the reading with no change in moisture at all. Different soils give different numbers at the same dampness. Compost and sandy soil are not comparable.
So a number from this sensor means something only against other numbers from the same probe, in the same pot. Every threshold must be measured where it will be used. A value copied from a tutorial, including this one, is worthless.
It corrodes, and this is the real limitation
Running a current through two metal electrodes in damp soil is electrolysis. The tracks oxidise and eventually the plating lifts off, and the readings drift the whole way through.
Left permanently powered in a damp pot, a resistive probe like this can degrade visibly within weeks.
The fix is to power it only while reading. Instead of wiring VCC to the 5V rail, wire it to a digital pin: turn the pin on, wait a moment for the reading to settle, take it, turn the pin off. A plant does not dry out in a minute, so reading once every ten minutes is plenty, and the probe spends 99.9 percent of its life unpowered.
The board draws only a few milliamps, well within what a pin can supply. The example below does this, and it is the main reason to prefer it to the simpler version.
If you need a probe that will last outdoors for years, the capacitive type is the answer, because its electrodes are not in contact with the soil at all.
Pin reference
| Pin or label | Connect to | Purpose | Notes |
|---|---|---|---|
VCC |
Uno D7 |
Power, switched | Not the 5V rail, so the probe is only live while reading |
GND |
Uno GND |
Ground | |
AO |
Uno A0 |
Analog reading | The one to use |
DO |
Not connected | Threshold output | Only if you need the pin back |
Probe + and - |
The comparator board’s two-pin end | The electrodes | Either way round |
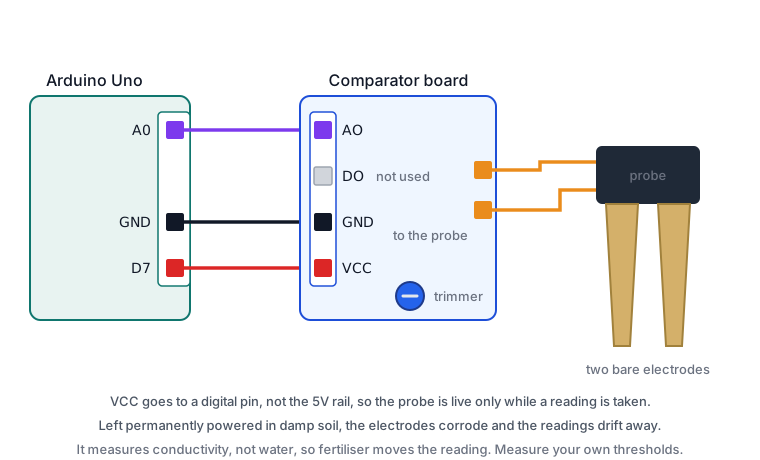
Wiring steps
- Unplug the USB cable.
- Join the probe to the comparator board with the two supplied leads.
GNDon the comparator board to the Uno’sGND.VCCon the comparator board toD7. Not to5V.AOtoA0.- Leave
DOunconnected. - Plug the USB cable back in. The power LED stays dark until the sketch drives
D7high, which is correct.
Software and libraries
No library is required.
Minimal working example
Measure your own range first. Nothing else in this tutorial is useful until you have.
// Siratek: find the real range of your probe, in your soil.

const int sensorPin = A0;
const int powerPin = 7;

void setup() {
  pinMode(powerPin, OUTPUT);
  digitalWrite(powerPin, LOW);

  Serial.begin(9600);
  Serial.println("Siratek: try the probe dry in air, then in water, then in your pot.");
}

void loop() {
  digitalWrite(powerPin, HIGH);
  delay(200);                       // let the divider settle
  int reading = analogRead(sensorPin);
  digitalWrite(powerPin, LOW);

  Serial.print("reading = ");
  Serial.println(reading);

  delay(1000);
}
Do three things with this and write the numbers down: hold the probe in dry air, stand it in a glass of water up to the line on the board, and push it into the pot you actually care about, once just after watering and once when the plant is ready for more.
Air and water give you the two extremes. The two pot readings give you the range that matters, and the threshold belongs between them.
Note the 200 millisecond settle after switching the power on. Without it you read the divider before it has stabilised and get a number that is too high.
Watering only when it is needed
// Siratek: check every ten minutes and report when the soil is dry.

const int sensorPin = A0;
const int powerPin = 7;

// Measure your own. Higher reading means drier on this wiring.
const int dryAbove = 700;
const int wetBelow = 450;

const unsigned long interval = 600000UL;  // ten minutes

unsigned long lastCheck = 0;
bool dry = false;

int readSoil() {
  digitalWrite(powerPin, HIGH);
  delay(200);

  long total = 0;
  for (int i = 0; i < 8; i++) {
    total += analogRead(sensorPin);
    delay(10);
  }

  digitalWrite(powerPin, LOW);
  return total / 8;
}

void setup() {
  pinMode(powerPin, OUTPUT);
  digitalWrite(powerPin, LOW);
  Serial.begin(9600);
  lastCheck = millis() - interval;   // check once at startup
}

void loop() {
  if (millis() - lastCheck >= interval) {
    lastCheck = millis();

    int reading = readSoil();
    Serial.print("soil = ");
    Serial.println(reading);

    if (!dry && reading > dryAbove) {
      dry = true;
      Serial.println("dry: water the plant");
    } else if (dry && reading < wetBelow) {
      dry = false;
      Serial.println("watered");
    }
  }
}
Two thresholds again, not one, for the same reason as the LDR: a single threshold makes the state flap whenever the reading wavers. Here it would be worse than untidy, because this is the sketch that eventually drives a pump.
Averaging eight readings smooths the noise. The probe is in damp earth, which is not a quiet electrical environment.
Expected result
A reading that is high in dry air, low in water, and somewhere between in soil. The exact numbers are yours alone.
The power LED on the comparator board should blink briefly once per reading and be dark the rest of the time. If it stays lit, VCC is still on the 5V rail.
Troubleshooting
| Symptom | Likely cause | Check or fix |
|---|---|---|
| Reading never changes | Probe leads not connected | Check the two-pin link to the probe |
| Reading pinned at maximum | AO not connected, or probe open |
Check A0 and the probe leads |
| Power LED always on | VCC on the 5V rail |
Move it to a digital pin |
| Reading drifts over weeks | Electrodes corroding | Switch the power; consider a capacitive probe |
| Tracks look dull or pitted | Already corroded | Replace the probe; it will not recover |
| Numbers differ from a friend’s | Different soil and probe | Normal; always measure your own |
| Reading jumps after feeding | Fertiliser raises conductivity | Expected; it measures conductivity, not water |
| Values unstable | No settle time after power-up | Wait 200 ms before reading; average several |
DO never changes |
Trimmer set past the range | Use AO instead |
| Works in a glass, odd in soil | Probe not fully in contact | Firm the soil around it |
Next steps
- Easier first: Measuring Light with an LDR, which is the same divider with light.
- Related products: the rain and water level sensor, which works the same way, and a relay for switching a pump.
- Next project: an automatic watering system. Build it with a low-voltage pump and read the relay tutorial’s safety section first.
Sources and attribution
All text, wiring guidance and code in this tutorial are original Siratek work.
- The two-part construction described here, a passive fork probe plus an LM393 comparator board with an
AO DO GND VCCheader, a trimmer and two indicator LEDs, was read from the Siratek product photographs for item 2841.
Every threshold in this tutorial is presented as something the reader must measure in their own soil rather than copy. The corrosion behaviour of resistive probes is a property of the electrochemistry rather than a fault, and the switched-power approach given here is the standard mitigation. No third-party tutorial text, diagrams, photographs or code has been reproduced here.